A while back, I posted a postmortem for my game, Lucky Shot. In it, I mentioned that one of the aspects that was most well-received was the AI. I myself found this amusing — while it was a good system, it was incredibly simple, only a small step above the enemies you see in a game like Super Mario Bros. So how did the enemies move so smoothly? A lot of it has to do with the movement system, and that’s what I’m going to cover in this article.
Before I get started, though, I’d just like to say that this likely won’t be anything new to anyone who’s programmed a physics system in a game before — in fact, if you have, you will likely see this as overly basic. And it is. This is meant more as a beginner’s introduction and as a showcase on how some very simple ideas can lead to some very nice behaviour. It does, however, require some knowledge of high-school level math and physics.
The development of Lucky Shot started well before the competition even started — the fundamentals of its physics and movement had been developed earlier, while I was playing around with top-down-shooter-style movement and learning Actionscript 3. I came up with the movement system when I was playing around with creating a top-down shooter-style game based on the Doppler effect. The mechanic itself turned out not to be that fun, so I never continued with it, but the simple ideas behind its movement system has powered nearly every game I’ve made to date.
In order to best understand how it works, I’m going to lead you through the same thought and discovery process that I went through when coming up with this. In the beginning, I had just started playing around with Actionscript 3, so I started out by moving a circle around the screen in what is probably the most basic way possible: every frame, the game would check whether the arrow or WASD keys were held down, and if so, it would add or subtract a constant value from the circle’s x and y position as needed. (I called this constant value the circle’s base speed.) This gave me something like this:
[kml_flashembed publishmethod=”static” fversion=”10.0.0″ useexpressinstall=”true” movie=”http://www.utgddc.com/wp-content/uploads/2011/10/Test-Keyboard-Control.swf” width=”500″ height=”500″ targetclass=”flashmovie”]

[/kml_flashembed]
Click above and use the WASD or arrow keys to move around!
This is a start, and for a simple game this might even be good enough. But there are some obvious problems with it:
- You move at a constant speed.
- You stop moving as soon as you let go of the key.
- Moving diagonally is faster than moving purely horizontally or vertically.
Points 1 and 2 can be summarized in two words: no inertia. So let’s try a different approach: instead of adding a constant amount to the player’s position every frame, let’s try adding a constant amount to the player’s velocity, with a cap on the velocity to ensure the player doesn’t rocket off at ridiculous speeds. This means that the arrow keys would control the direction the player accelerated rather than the direction the player went. This strategy gave me this:
[kml_flashembed publishmethod=”static” fversion=”10.0.0″ useexpressinstall=”true” movie=”http://www.utgddc.com/wp-content/uploads/2011/10/Accelerated-Movement.swf” width=”500″ height=”500″ targetclass=”flashmovie”]
[/kml_flashembed]
Click above and use the WASD or arrow keys to move around!
You’ll notice also that I added a bit of functionality to bounce the player off the walls. This is as simple as inverting the player’s x or y speed once the player is out of bounds.
This is much better already. Now when we press a direction, we’ll accelerate in that direction, and it feels much more smooth. But there are still some problems with this:
- When you let go of the keys, you never slow down — you’ll keep moving and bouncing forever.
- You accelerate faster diagonally than you do purely horizontally and vertically.
Let’s look at the first problem. Again this can be summarized in two words: no friction. Let’s add some simple friction.
The version of friction I implemented was inspired by the concept of terminal velocity. When an object is falling in air, that air applies a frictional force to it in the opposite direction of movement. This frictional force is proportional to the object’s velocity, so as the object falls, it gets faster, causing the friction to increase, which in turn causes it to accelerate at a slower rate. Eventually you reach a point where the air friction balances out the force of gravity, and the object’s speed stops increasing.

In my implementation of this, we don’t deal with forces, nor with gravity. Instead of dealing with forces, we can deal with accelerations instead. And instead of gravity, we have an acceleration imparted by keys that the player is pressing, or in the computer-controlled enemies, the AI’s logic.
The first thing we do is figure out the acceleration for the object, which is a constant value (which I call the base acceleration), but may be in a variety of different directions (more on that below). Then, we calculate deceleration due to friction [latex]f[/latex], which is the object’s velocity [latex]v[/latex] multiplied by a friction coefficient [latex]\mu[/latex], which is a number in the range of about 0.05 – 0.1, depending on how much friction you want to give the object.
[latex]f = \mu v[/latex]
The deceleration due to friction [latex]f[/latex] is then subtracted from the object’s acceleration, and that acceleration is added to the object’s speed. The second-last thing we do is compare the object’s speed to a very small value — about 0.01 — and set it to 0 if it’s below that. This is needed because with this implementation of friction, the object’s velocity never actually reaches 0, it just gets very very close to it. This causes a bit of “drift” when the object slows to a halt, where it keeps moving by a fraction of a pixel each frame.
The last thing we do, of course, is add that speed to the object’s position.
We can tweak the motion of the object by changing the constant base acceleration [latex]A[/latex] and the friction coefficient [latex]\mu[/latex]. The bigger we make [latex]A[/latex], the faster the object will accelerate. The bigger we make [latex]\mu[/latex], the slower the object will move, and the faster it will come to a halt. The object’s maximum or terminal velocity is the point at which these two balance out: [latex]\frac{A}{\mu}[/latex]. If you want the object to feel like it’s sliding on ice, you can decrease both [latex]\mu[/latex] and [latex]A[/latex]. If you want the object to stop and start instantly (similar to the movement in the first flash demo), you can increase both [latex]\mu[/latex] and [latex]A[/latex]. And as long as you keep the ratio between the two the same, the object will always move at the same speed.
So now we have friction. You no longer bounce infinitely off the walls, and turning is made a lot easier. There’s just one last issue to address, and that’s the increased acceleration when going on a diagonal. To fix this, we need a tiny bit of trigonometry.

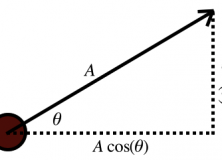
Say you want your little dude to go at an arbitrary angle [latex]\theta[/latex], but you want to keep his base acceleration as [latex]A[/latex]. That is, no matter which direction he’s going, his total acceleration should always be [latex]A[/latex]. To use this in the code, we need to break this down to its x and y components, which I’ll call [latex]a_{x}[/latex] and [latex]a_{y}[/latex]. This is as simple as doing this:
[latex]a_{x} = A\cos{\theta}\\*a_{y} = A\sin{\theta}[/latex]
Plug in whatever angle you want for [latex]\theta[/latex], use these as the acceleration values for your x and your y, and you have yourself some smooth movement whose speed and acceleration is independent of the direction you’re moving. In fact, if you’re just handling keyboard control — where you have at most 8 directions in which you can move — you can just handle the straight up/down case by just using the base acceleration [latex]A[/latex], and the diagonals by adding [latex]\pm A\frac{\sqrt{2}}{2}[/latex] to the x and y values with the sign dictated by the direction (this is the same as [latex]sin{(45^\circ)}[/latex]).
Now that we have all this set up, let’s see it in action.
[kml_flashembed publishmethod=”static” fversion=”10.0.0″ useexpressinstall=”true” movie=”http://www.utgddc.com/wp-content/uploads/2011/10/Friction-Movement.swf” width=”500″ height=”500″ targetclass=”flashmovie”]
[/kml_flashembed]
Click above and use the WASD or arrow keys to move around!
Wonderful. We now have a movement system that’s smooth, simple, flexible, and fun in and of itself. But here’s the dirty secret: this takes care of most of the natural-looking movement you see in this game’s AI. In part 2, I’ll show you how this system, along with some very simple rules of movement, created an AI system that was both fun and challenging to players.